have dislocated my shoulder, what does this mean?
Your shoulder is a ball and socket joint. When you dislocate your shoulder the ball is forced out of the socket. It is now back in place, and you will have had an X-ray to confirm this.


Is there anything that can go wrong?
Often there are no major complications. However sometimes you can injure the muscles, bones and nerves around the shoulder. At your appointment with the Leeds Shoulder Clinic, this will be assessed, and further tests may be requested if required.
How can I avoid this happening again?
In the early days you should avoid positions which put your shoulder in a vulnerable position to dislocation, such as the ‘high five’ position, putting your hand behind your head, overhead throwing and reaching into the back of a car.
Unfortunately, for some individuals the shoulder will dislocate again.
What should I do if the shoulder dislocates again?
Seek urgent care from the Emergency Department.
How long should I wear my sling?
A sling will have been provided by the Emergency Department. This is for comfort and may be removed and discarded as soon as you feel comfortable to do so. We encourage you to wean from the sling within the first week, with two weeks use expected at maximum.
Should I move my arm?
Yes. It is important to regularly exercise your hand, wrist and elbow regularly to prevent stiffness, particularly in the early days whilst using the sling. Early movement of the shoulder is safe and should be performed regularly. Staying in the sling for a longer duration does not reduce your risk of dislocating the shoulder again. Using the arm for light day to day tasks is useful to begin rehabilitating your shoulder.
Pain management
Some discomfort is to be expected on starting exercises for your shoulder, however if this is impacting on your sleep and failing to settle, consider reducing the intensity of the exercises performed. If you experience shoulder pain, the use of ice packs (e.g. a bag of frozen peas) placed on the shoulder can be helpful to reduce pain. Remember not to put the ice pack directly on your skin, but wrap it up in a towel and place it on the shoulder for approximately 20 minutes at a time.
Use of over-the-counter pain relief such as Paracetamol and Ibuprofen can also help you in the early days. It is best to talk to your pharmacist to get advice on how much and how often to take these if you are unsure.
Work
You can return to work when you feel comfortable to do so. However, if your job is very physically demanding you may need to discuss alternative duties or wait to return until after six weeks.
Driving
You can get back to driving when you no longer need to wear the sling, and you feel you can drive safely without putting yourself or others at risk. You must be able to manoeuvre the vehicle to take evasive action in the event of an emergency, and be able to take the hand break on and off.
Exercises
The aim of performing shoulder exercises in addition to your normal daily activities is primarily to improve the sensorimotor control of the shoulder. Exercises should be introduced gradually, increasing both the number of repetitions and the number of times you do the exercises each day.
The following exercises may be helpful in the early stages.
1. Supported wall slides

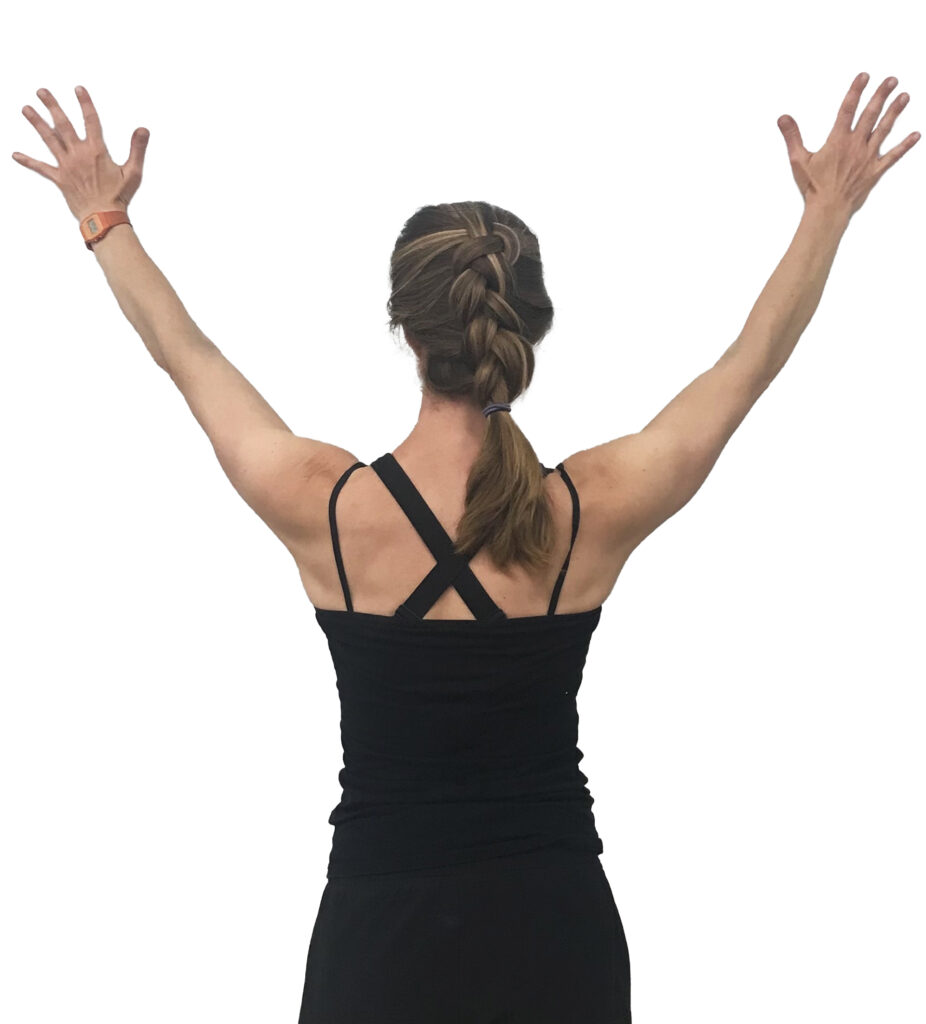
To start, face a wall with your hands slightly apart on the wall.
Maintaining pressure on the wall, push your arms up and out in a “V “ shape, as far as you feel comfortable to do so. Maintain the pressure on the wall as you bring your arms back towards the starting position.
You can add a slow step forward with the opposite leg to your painful shoulder as you elevate your shoulders, to further develop the exercise. Step back slowly as you bring your arms back down to the starting position.
2. Table top slides


2a. Start, facing a table or worktop. Slide your hands forwards as far as comfortable whilst bending your knees to stick your bottom backwards, achieving a slight squat position
Slide your arms back towards you as you return to an upright position.
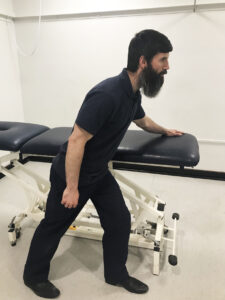

2b. Standing sideways on to a table or work top, slide your affected arm diagonally away from your body. At the same time, step forward with the opposite leg to your painful shoulder as you slide your arm forward. Slide your arm back towards you as you return to an upright position.
These exercises may be useful if you are particularly sore and to build up to the supported wall slide exercise.
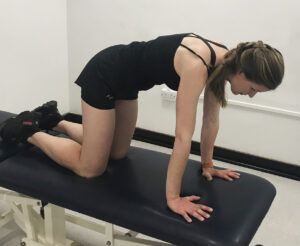
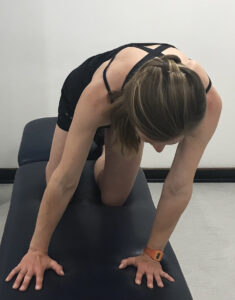
3. Weight transference
Either on the floor if you are able to, or on a bed, start on your hands and knees with your shoulders over your wrists, and your hips over your knees. Gently transfer your weight from side to side, keeping control of the shoulder and a relatively flat back.

4. Isometric strengthening
With your affected arm, push against the wall, maintaining muscle activation without movement of the arm. Hold the contraction for approximately 5 seconds, relax, and repeat for the following actions:

4a. Standing sideways on to a wall with your elbow bent at 90 degrees, push with the back of your hand into the wall
4b. Standing sideways on to a wall with your elbow bent at 90 degrees, push with outside of your elbow into the wall.

4c. Standing with your back against a wall with your elbow bent at 90 degrees, push with the back of your elbow into the wall.
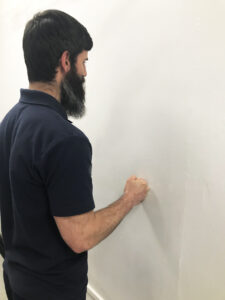
4d. Stand facing the wall with your elbow bent at 90 degrees, push your fist into the wall.
4e. With your elbow bent at 90 degrees, use your non painful arm to resist your affected arm rotating inwards towards your body.
What happens next?
You will normally receive an appointment from the Leeds shoulder clinic within two weeks of your shoulder dislocation. At the appointment you will be asked questions and examined to see how you are progressing. The clinic staff can answer any questions you may have and provide you with further information on what to do next.