This leaflet aims to help you and your family understand more about your treatment with an external fixation device (such as the Ilizarov frame). It will be given to you in addition to the information you will receive from your surgeon.
The leaflet describes general information about coping with the device day-to-day. It also describes the physiotherapy exercises you will be advised to do to help your recovery. We also give you information about the pin sites (where the wires or pins enter your skin).
The healthcare team looking after you will explain everything to you in detail. If you hear any words or phrases that you do not understand, please ask your doctor or a member of your healthcare team what it means. It does not matter how many times you ask.
Contacts
Teresa Chippendale – Frame Nurse Specialist
Secretary for Mr D M Taylor, Mr S Britten and Mr P J Harwood
Secretary to Mr P Foster
Outpatient Orthopaedic Clinic
Ward L10 (Major Trauma)
Plastics Dressings Clinic
The Limb Reconstruction Team
Consultant Orthopaedic Surgeons
- Mr Simon Britten
- Mr Paul Harwood
- Mr Patrick Foster
- Mr Martin Taylor
Limb Reconstruction Nurse Specialist
Teresa Chippendale
Getting in touch
The clinical nurse specialist is available during office hours (8.00 am – 3.30 pm Monday, Wednesday and Friday, and 8.00 am – 6.00 pm on Tuesdays and Thursdays). Voicemails can be left or a text message can be sent out of these hours and will be responded to as soon as she is available.
When Teresa is on leave, please contact Outpatients on the given contact number.
If you require urgent medical attention, please attend your local Emergency Department.
What is an External Fixator?
When a bone is broken (fractured), it is often held in a certain position to allow it to heal. It can either be held by a plaster cast or a surgical device. Such a device holds or ‘fixes’ the bone in this position. There are different types of devices. Some of these are placed in or on the bone but under the skin. These are called ‘internal’ fixators and are usually plates and screws or rods / nails. The other type of fixator, which is held outside the skin is called an ‘external’ fixator.
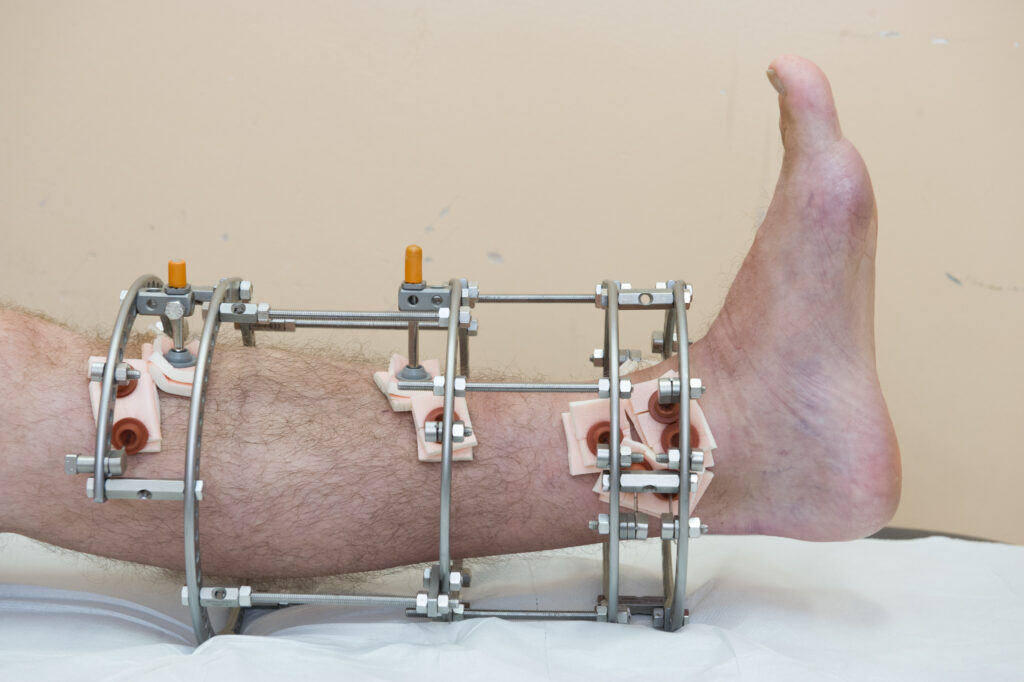
A circular frame is a type of external fixator. They were first introduced by Gavriil Ilizarov, a Russian surgeon who pioneered the technique during the 1950’s; hence, these are often called ‘Ilizarov frames.’
The frame is usually made of metal rings (commonly, stainless steel) but carbon fibre rings are also available. The rings are held together by rods. Wires are used to connect the rings to the bone. Wires are drilled through the bone and each wire is attached to the ring at two points across from each other. Before they are attached, the wires are tensioned to make the device more stable. Sometimes, ‘half pins’ are used in addition to wires. These again are drilled into the bone but are only attached to the ring on one side.
Why have a Circular Frame?
As circular frames are stable devices, they allow a patient to walk with a fracture. This helps the bone to heal and is beneficial for rehabilitation. Usually, patients are allowed to put their full weight through a circular frame. Your surgeon will confirm this with you after your surgery.
In addition to treating new fractures, particularly those that are complex, circular frames can be used to treat old fractures that haven’t healed (non-unions) or that haven’t healed in their normal position (mal-unions). They can be used to make bones longer and can be used as part of the treatment of bone infection (osteomyelitis).
Circular frames are not available in all hospitals. As a tertiary referral centre for the region, we at Leeds Teaching Hospitals NHS Trust perform a large number of these operations per year for a wide range of problems.
General information
Pain control
Whilst in hospital, following the application of the frame, we work closely with the anaesthetists to control your pain which may be:
- Nerve block – which block the pain signals to your leg for approximately 24 – 48 hours; and
- PCA (Patient Controlled Analgesia) – this is an intravenous infusion, where you control the amount of pain relief you need. This is usually taken down after 24 – 48 hours.
All patients are prescribed regular Paracetamol and Codeine / Dihydrocodeine to help with the pain.
Pain relief is very important during your recovery, this helps enhance your recovery as you will be able to mobilise if you are not in pain.
Please avoid any anti-inflammatory drugs such as Ibuprofen, Naproxen and Dicolfenac (Voltorol) as these can slow bone healing.
Post-operative care
A thick white bandage will cover the frame to protect your non-operative leg, whilst recovering from the anaesthetic. The average stay in the hospital is 3 – 5 days.
If you are a patient who is not from Leeds, you may be discharged back to your local hospital before you go home.
You will be shown how to care for your frame before you are discharged from hospital – this is usually day 2 when your pin site care will begin.
You will be regularly seen by the wards physiotherapists who will also give you exercises to do, whilst the frame is in situ.
You will be seen by your surgeon or specialist nurse, 2 – 3 weeks following surgery in the fracture clinic at the Leeds General Infirmary. If everything is going well, you will be followed up every 4 – 6 weeks before frame removal.
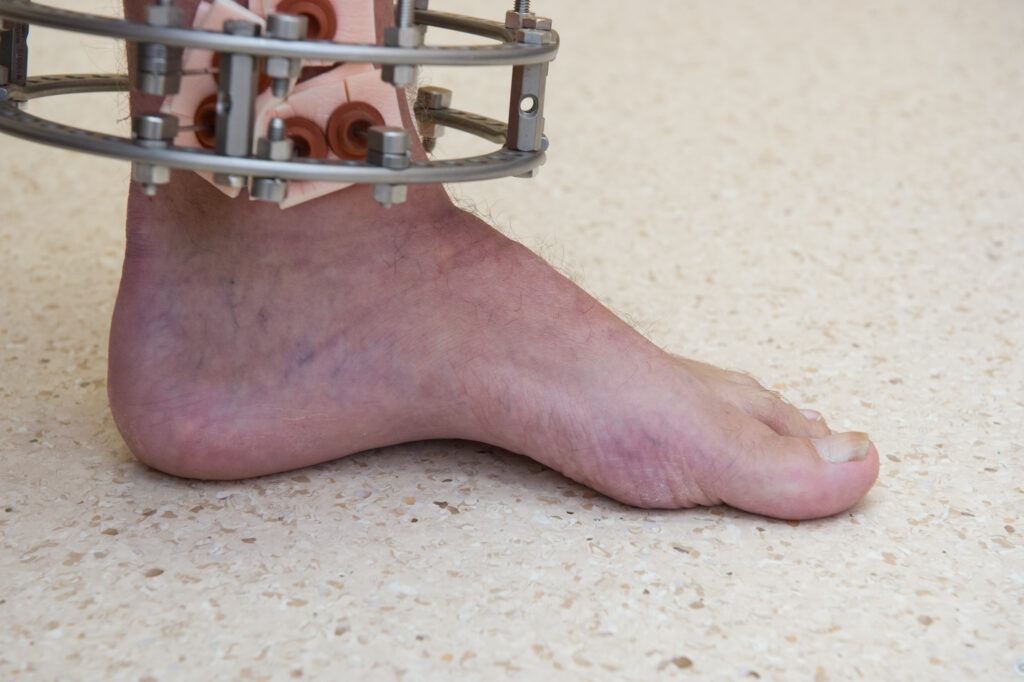
Swelling
All legs swell with a frame on, particularly in the first few weeks. This is not normally painful in itself. Although we encourage full weight-bearing and walking whenever possible, this can increase swelling so following a walk, resting the leg up on the stool or pillow is advised. If the swelling is associated with localised pain, redness or discharge around a pin site, then this may represent infection (see pin site care). If the swelling is such that the skin starts to touch the inside of a ring, then please elevate and let us know as this can cause pressure on the skin.
DVT (Deep Vein Thrombosis) is possible but thankfully extremely rare with a frame on. We advise contacting or attending the frame clinic first before attending the Emergency department, unless there are features suggestive of a PE (pulmonary embolus) such as new shortness of breath or chest pain.
Thrombosis prevention
The best way to prevent this is to keep hydrated and healthy and keep moving, particularly the knee and ankle. You will also most likely be prescribed preventative injections after your fracture. This is an injection in to your stomach or arm for up to 6 weeks after you have your frame applied.
Problems with wires
The wires are tensioned and connected to the rings at the time of the operation. Although rare, in some cases, the wires can either disconnect from the rings or snap. This is not an emergency and rarely causes any pain. If this happens, we advise to stop putting all the weight through that leg and contact the limb reconstruction nurse a day or two using the contact details listed. Often, this can be reconnected or removed in clinic. In some cases, another small operation under general anaesthetic may need to be arranged to replace the wire.
Smoking
Smoking tobacco, e-cigarettes or other substances definitely slows down the bone healing, which means the frame will have to be on longer. It also means that problems such as infections are more likely. This also includes passive smoking so please avoid exposure to smokers, particularly indoors. We advise contacting the GP if help is required to stop smoking and many patients use the frame treatment as an opportunity to stop completely.
Complications of smoking can include:
- longer recovery;
- have an increased chance of fractures to bones not healing (non-union);
- needing more pain relief; and
- having wounds that take longer to heal and more likely to get infected.
Bathing and showers
With pin site care, it is advised to keep the leg dry. Although once per week on the day of your pin site care, you may remove all dressings from around your frame and shower as normal. You may wash your frame rings but not the wires. After showering dry the frame with a clean towel or a hair dryer on cool, then complete your pin site care.
Going in the sea, lakes or rivers is not advised as there is an increased infection risk.
Driving
It is not the decision of the consultant as to whether any patient is fit to drive with a frame on or otherwise. This is a matter for the insurance company but there are obvious difficulties in driving with a frame on, particularly manual cars and a frame on the right leg. As a passenger, frame patients are normally able to get in and out of cars and sit with a frame on but there will be increased swelling when sitting with the leg down for long distances.
Clothing
The width of the rings can be up to double that of the leg itself so this does cause problems with clothing. Shorts, baggy trousers or tracksuit bottoms are often used or modified. Skirts or wide dresses can be worn. The frame does not have to be covered up but is appreciated that some patients can be self-conscious when out in public.
Shoes
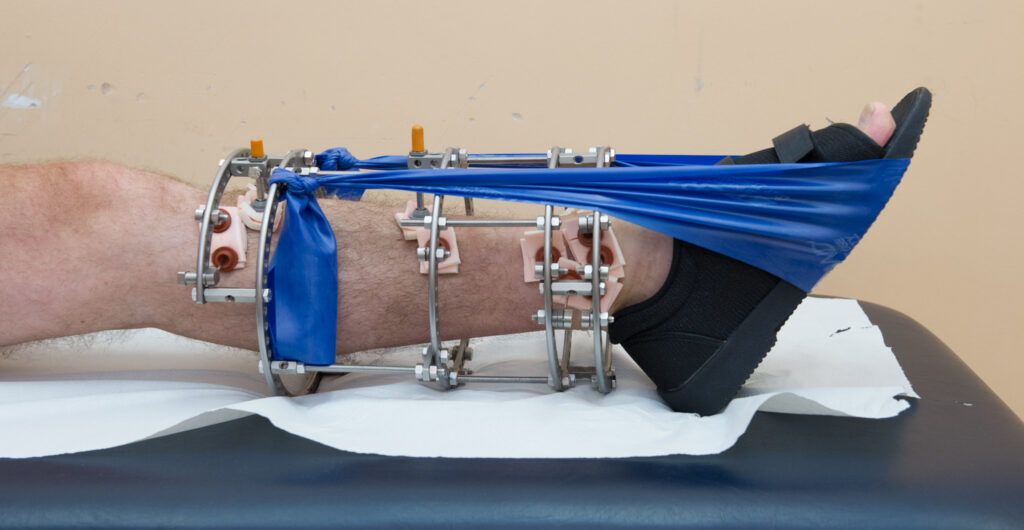
We aim to get patients back to normal footwear as soon as possible but in most cases for the first few weeks the black post-operative shoe will be applied, with the theraband as described in the physiotherapy section of this leaflet. When the physiotherapists are happy that you have good ankle control, normal footwear can be worn within reason. Even if there are no wires in the foot, most patients still have a degree of foot swelling with a frame on so footwear will have to allow for this.
In some cases, wires or rings are applied around the heel and foot, and more specialized footwear may need to be created or modified to fit around the metalwork.
Work
For the first 2 weeks, there is normally too much swelling and discomfort to allow work. From this point on, it is very variable as to how much work each patient will be able to carry out, depending on the reason for frame application, other injuries and type of work planned. Patients are encouraged to get back to work in some form, whenever possible. This helps general recovery by patients keeping active and positive.
Employers can be very helpful in helping patients get back to work with a frame on. This includes help with transport, more sedentary or light duties, working from home and altered hours. We advise discussing these options with your employer.
It is appreciated that certain jobs are simply not safe with a frame on such as roofing and in these cases, fit notes can be issued by clinic or by your GP.
Physiotherapy
Physiotherapy plays a very important role in your recovery, this information has been provided to advise you on your rehabilitation process and answer any questions you may have.
Daily goals
Day 1
- Application of elastic material (theraband) to support your foot.
- Carry out leg exercises which will be taught to you.
- Transfer in and out of bed with assistance and aim to walk with a frame.
Day 2+
- Increase your walking and aim to progress to elbow crutches.
- Practice walking up and down stairs if required.
On discharge
- Be independent with exercises provided.
- Walk independently with a walking aid, with a good walking pattern.
- Walk independently up and down stairs, if necessary.
- A physiotherapy appointment at your local hospital will be arranged to continue your rehabilitation. If you have not received an appointment within 2 weeks, please contact us.
What is the purpose of the theraband?
It is attached from the frame and placed around your footwear to maintain a good ankle position and prevent shortening of your calf muscles. It will also assist in achieving a good walking pattern.
Never place the theraband directly onto your skin and ensure you check the skin on the sole of your foot daily for sore areas.
Ensure you remove your theraband every 2 hours for 1 hour, for the first few days at least.
Keep your theraband on when you are walking and you can remove this when you are in bed. Your physiotherapist will advise you when it is no longer required.
Exercises
You will be given exercises, which are designed to keep your ankle and knee joints moving and help strengthen your muscles.
In order to regain full function, it is important that you carry out the exercises four times per day.
The following exercises will be demonstrated to you by your physiotherapist.
If your frame crosses your knee or ankle, your exercises will be modified as you will not be able to move that joint.
Early exercises
Aim to carry out your exercises four times per day. Most of your exercises will cause some discomfort around your pin sites. This is normal. If it is very painful, ask your physiotherapist about it.
Static Quads

Sit with affected leg out straight with your foot pointing upwards. Aim to get your knee as straight as possible. Hold for 10 seconds.
Repeat 10 times.
Straight Leg Raise

Keeping knee straight, lift your foot and frame off the bed. Hold for 5 seconds.
Repeat until the thigh muscle feels tired or until you are not able to hold your knee straight.
Calf Stretch

Keeping your knee straight, place a towel around foot and pull toes towards you.
Hold for 30 seconds.
Resisted Ankle Movement
Keeping knee straight, push your foot down against the theraband and then slowly release. Repeat until your calf muscle feels tired.
Ankle Movement Upwards
Keeping knee straight, bring your foot up towards you. Repeat 10 times.
Ankle Movements Downwards

Keeping the knee straight, point toes away from you. Repeat 10 times.
Knee Extension

In supported sitting, straighten your knee out in front of you until fully straight, keeping your foot pointing upwards. Hold for 5 seconds and slowly lower back down.
Knee Bend

In sitting, keep your foot flat on the floor and slide your foot backwards to bend your knee. Repeat 10 times.
Ankle Strengthening (outwards)

Sit with feet on floor. Put your hand as a fist between your knees.
Keep knees in contact with your hand and lift outside of foot.
Foot Posture
Sit with feet on the floor. Attempt to raise the arch of your foot with keeping your heel and toes on the floor.
Intermediate exercises
Calf Stretch

Calf stretch stand with the end of your big toe on your frame leg touching the wall and your heel touching the floor, both feet facing forward. Lean forward until the frame knee touches the wall. Hold for 30 seconds.
Repeat 10 times.
Calf Stretch

Leaning towards the wall using hands for support, step your good leg in front of you and bend your knee. Keep your back leg straight behind you and push your heel down, keeping your toes facing forward.
Repeat 30 times.
Heel Raises

Stand with support in front of or in parallel bars, lightly holding on. Using both feet, raise up on to tiptoes. Slowly lower heels to ground.
Hamstring Curl

Lie on your front and bend your knee to about 90 degrees, gently return to straightened position. Repeat 30 times.
To advance this exercise, add an ankle weight.
Hip Extension

Lie on your stomach keeping your back straight and your hips level, bend the knee of your frame leg to about 90 degrees.
Keeping the knee bent, raise the foot up and backwards.
Keeping the knee bent, lower the foot. Repeat 10 times.
Wall Slides

Stand with your back against the wall, feet slightly forwards and about shoulder width apart. Bend your knees and slid down the wall to about 45 degrees, try not to let your knees move inwards.
Hold for 10 seconds and return to stand position. Repeat 5 times.
Emotional implications of having a circular frame
Throughout your treatment, you may experience emotional reactions such as sadness, worry or anger about your external fixation device – this is normal. It is important to consider the circumstances around needing your external fixator; for example, being involved in a traumatic accident, a lengthy or a failed treatment process, or other stresses at the start of treatment may make you more likely to experience a difficult emotional reaction. You may find that the external fixator does not cause any difficult emotional reactions and people cope differently with the treatment. It is important to think about returning to your usual activities as soon as you are able to.
There are clinical psychologists who are trained people who can talk through problems with you. If you think you would benefit from this, please speak to your consultant or nurse who can refer you.
It is worthwhile thinking about speaking to a clinical psychologist if you are experiencing any of the following:
- intense feelings or bodily sensations that are overwhelming;
- feeling panicky or anxious;
- struggling with the appearance of the frame / injury;
- uncontrollable anger or feeling irritable;
- withdrawn or isolated; and
- sleeping difficulties.
Pin site care
Pin sites are where wires or pins go through the skin before attaching to the bone. It is important to look after these carefully in order to prevent problems such as infection. Wherever possible, the patient or family should take ownership and carry out pin site care, with appropriate guidance and support. The methods we use are based on sound evidence and adhere to national guidelines.
After the operation
The first pin site dressings are put on in the operating theatre at the end of the operation, while the patient is still under anaesthetic. The first change of pin site dressings is carried out on the ward 2 days later. Normally, this is the best opportunity for the patient and family to learn how to do it, taught by the ward nurses. Before being discharged home after the operation, the patient is given full instructions on pin site care, as well as being given all the necessary equipment. Only if patients and families are incapable for whatever reason do we arrange community nurses to carry out pin site care after discharge. Very occasionally, if there is significant on-going pin site problems, we may arrange for the pin site care to be carried out by our outpatient staff.
Timing of pin site changes
After the first pin site dressing change at 2 days, the basic principle of pin site care is to keep them covered at all times and change the dressings just once per week. Often, this can be combined with a shower but new dressings should not be placed on the leg until it is completely dry.
If there is a problem with oozing or infection, the dressings on the troublesome pin site should be changed twice per week or every other day if necessary.
Cleaning fluid
The most efficient cleaning solution is 0.5% alcoholic Chlorhexadine (Hydrex) but this can be irritable in some cases. If there is a skin reaction, then saline or cooled boiled water can be used instead or the solution diluted.
Crusts
Dry crusts can often form where the wires enters the skin. These are natural and have been shown to protect against infection. Although it may be tempting to remove them, please do not as this can cause bleeding and infection. Crusts or scans which are firmly attached should be left in place but loose crusts are sometimes removed during the course of cleaning – do not worry about loose crusts falling off.
Details on pin site cleaning
Equipment needed
- Sponge sticks (can be collected from the Outpatients department).
- Cleaning solution: 0.5% Hydrex / Saline / cooled boiled water (see notes above, this can also be collected from the Outpatients department).
- Allevyn dressing (repeat prescription from GP).
- Clean scissors.
Instructions
- Wash your hands with soap and water.
- Pour the cleaning solution into the plastic tray.
- Cut the Allevyn sheet into 2 cm squares with slit cut in to the centre (like ’shorts’).
- Pull plastic clips or bungs away from the skin up the wire or pin.
- Remove and discard old dressings in the yellow bag provided.
- Clean pin sites individually using sponge sticks soaked in the cleaning solution. Do not remove crusts.
- Ensure all sites are dry. If necessary, dry each site with a clean piece of gauze.
- Cover each pin site with a double layer of Allevyn (white side to the skin, pin side up).
- Push down clips or bungs with enough pressure to hold the dressings in place but not too firmly.
- Dispose of unused dressings.
Pin site infection
Despite best care around one third of patients have a pin site infection during the time in the frame. This tends to be a minor nuisance rather than a major problem and for the vast majority of patients it is easily managed.
The signs of infection are:
- pain – around a particular pin sure or sites and in some cases, affecting ankle or knee movement;
- redness around the pin site, which may spread;
- swelling and the skin feeling warm;
- some reduction in walking ability and increased reliance on crutches;
- visible drainage of pus or thick fluid. Occasionally, this may smell. A small amount of clear straw coloured fluid may not be anything to worry about; and
- feeling unwell with fever.
Unless you are unwell, this is not an emergency but medical attention should be sought within 24 hours with the GP in the first instance. We do not recommend the routine taking of microbiology swabs. Flucloxacillin, 1 gram QDS (four per day) is the standard antibiotic if there is no allergy; otherwise, Clarithromycin, 500 mgs BD (twice per day) can be used. Pin site care should be more frequent than weekly with infection and discharge.
It is important to clean the infected wire individually with a new stick to prevent spreading of infection to other wires.
Skin Irritation
Particularly in patients prone to eczema or dermatitis, it is fairly common to develop a red rash on the leg around the pin sites, rather than infection. This may represent a reaction to the Hydrex cleaning fluid of Allevyn dressings. In these cases, we advise changing the cleaning fluid to cooled, boiled water or saline and using gauze squares instead of Allevyn. Under the guidance of the clinic or GP, appropriate creams may be prescribed.
Struts and corrections
If you have a frame and you need to do turns on the struts, it is important that you follow the instructions on either the printed programmes you will be given or download the special app, which you can scan and download on to your phone. This can help you to remember when to do the turns as it reminds you on your phone. Doing the turns may be uncomfortable as the turns are done very slowly, around 1 mm per day. Please remember to take your pain medication as necessary. If your struts or rods get stuck, then you can use 10 mm spanners to do the turns. If you have a problem, please ring the specialist nurse for help as sometimes we do adjustments in clinic.
When adjusting your frame to lengthen your leg, it is even more important to do your stretches and exercises as the muscles will become tight. They have to lengthen as well as the bone.
Frame removal
At the start of treatment, we can never predict exactly when the frame will be ready to be removed. This will occur when the consultant is happy that the frame has been on for a reasonable amount of time for the case, when he (or she) is happy with the appearance of the leg and also from detailed examination of the x-rays or scans. There is normally a period of a few weeks when the frame is deliberately loosened or ‘Dynamised’ to test out the leg first.
For the majority of patients, the frame is detached and wires removed under Entonox (Gas and Air) in clinic. For children and some adults, a short time in the operating theatre under general anaesthetic to remove the frame needs to be arranged. Normally, patients are then free to walk on the leg without a cast but we advise to stay off of sports and strenuous activity until review in clinic.
Following your frame removal, you will have gauze dressings and a bandage around your leg.
- Remove dressings after 3 – 4 days.
- Cover then with dressings if wires / pin sites have not formed a scab.
- When all pin sites have scabbed and healed, you may bath and shower as normal.
Frequently Asked Questions
How long will the frame be on?
You will be given a rough idea by your surgeon before frame application. The average time for a frame to be on is between 4 – 6 months, although some people can be much longer.
The frame can only be removed, once your bones have healed. You can help this by mobilising when your surgeon is happy for you to do so with the help and advice of your physiotherapist.
Can I walk with the frame on?
Most people are allowed and are encouraged to walk on their frame. This encourages the bone to heal. You will have been instructed by your surgeon and / or physiotherapist in hospital if you should walk on your frame or not.
Is it normal to have swelling around my frame / foot and ankle?
Yes. Swelling is common around your frame following surgery but you should aim to minimise this by regularly elevating your leg throughout the day. Your exercises may also help reduce swelling.
When I go home, what shoes should I wear?
Shoes like trainers will give your foot and ankle support and make it easier to walk. Make sure they are not in contact with any pin sites around your ankle.
What will my rehabilitation with physiotherapy involve on discharge?
A physiotherapy outpatient appointment will be arranged for you at St. James’s University Hospital or your local outpatient department for patients who live out of the Leeds area. This will allow you to progress with your exercises and improve your mobility. You should be seen initially within 2 weeks of discharge.
If you do not receive an outpatient appointment, please contact the nurse specialist on the given mobile number.